您的容器映像值得信賴嗎?看看 Docker Content Trust (DCT) 內容信賴功能如何將數位簽章運用於容器映像驗證以及管理可信賴內容

「映像是否值得信賴?」以容器建構的系統,其最重要一項必須解決的資安問題就是:驗證您所使用的容器是否正確,以及是否來自安全來源 (或者是否已遭惡意篡改)。根據我們的 2020 年 資安預測指出,惡意的容器映像一旦進入企業,很可能對企業造成危害。我們也曾撰文指出某些攻擊會利用不肖的容器映像來從事惡意活動,例如: 掃描網路上含有漏洞的伺服器及挖礦( coinmining )。
為了解決這項問題,Docker 推出了一項名為「內容信賴」(Content Trust) 的功能。此功能讓使用者能安心將映像部署至叢集 (Cluster) 或群集 (Swarm),並驗證是否為您原本想要的映像。不過 Docker Content Trust (DCT) 沒辦法做到持續監控您映像在 swarm 內所發生的變更或任何類似狀況。它單純只是一種由 Docker 用戶端 (而非伺服器) 所做的一次性檢查。
這一點對於 DCT 作為一種全時一致性監控系統的實用性有很大問題。趨勢科技在先前一篇有關雲端原生系統的一文當中提到可以使用像 Notary 這類映像簽署工具來解決「映像是否值得信賴」的問題。DCT 正是試圖提供一個內建工具讓 Docker 用戶端能做到這點。
本文將探討四個主題:
- DCT 如何運作?
- 如何啟用 DCT?
- 如何在持續整合/持續部署 (CI/CD) 的流程當中將信賴驗證步驟自動化?
- 此功能有何限制?
本文的另一個目的是提供一份完整教學來讓您了解如何輕鬆安裝及測試 DCT,因為現有的文件似乎相當零散稀少。
Docker Content Trust (DCT) 如何運作?
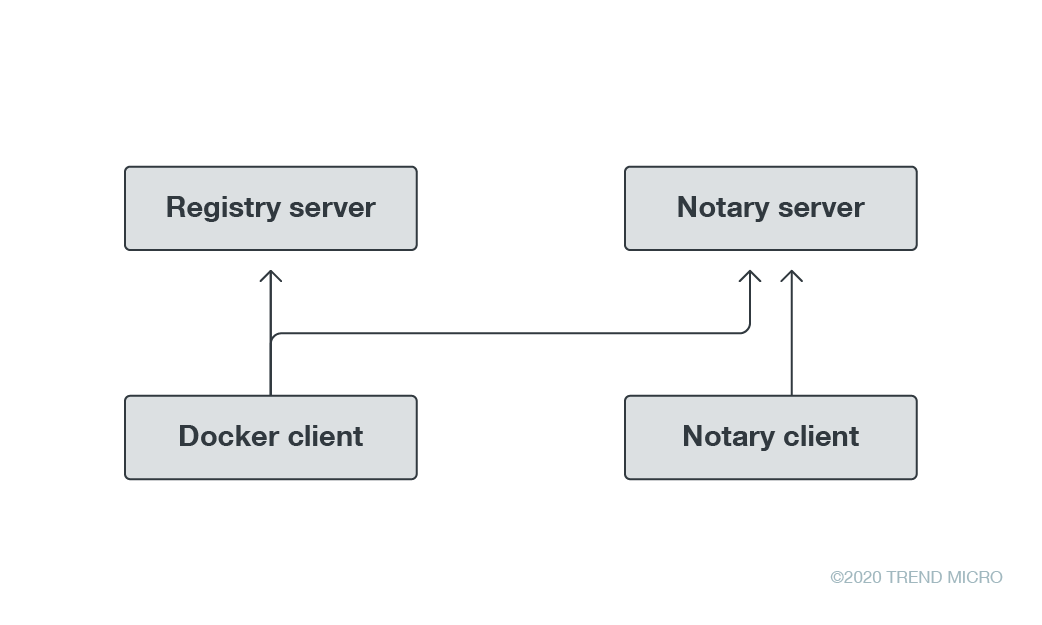
Docker Content Trust 的核心觀念其實非常簡單,它是 Docker 用戶端內建的一套邏輯,用來驗證從登錄伺服器 (registry server) 拉取 (pull) 或部署的映像,您可選擇要由哪個 Docker Notary 公證伺服器負責簽署。
Docker Notary 工具可讓映像發布人對其集合 (collection) 進行數位簽署,反之,使用者也可對拉取的內容進行一致性驗證。Notary 使用者可經由所謂的 The Update Framework (TUF) (更新架構) 來確認對任何資料集合的信賴,並管理內容新鮮度 (freshness) 確保的相關作業。若您還沒有用過 Notary 伺服器,請參閱 Docker 的介紹指南。
圖一顯示部署 Docker swarm 或使用「docker build –pull」指令時用戶端如何跟登錄伺服器溝通來取得所需的映像,以及 Notary 伺服器如何檢查映像簽章。如果您的環境變數設定正確,它將無法部署未經簽署的映像。由於您可以在另一台電腦上執行簽署,因此私密金鑰不需儲存在部署環境所使用的 Docker 管理節點上。
啟用 DCT
在預設狀況下 DCT 是停用的,我們必需執行幾個步驟來將它設定,以便能夠簽署我們所要部署映像:
- 設定登錄伺服器。
- 設定 Notary 伺服器。
- 將映像推送 (push) 至登錄伺服器。
- 簽署剛剛推送的映像。
- 啟用 DCT ─ 在管理主機上設定正確的環境變數,讓 Docker 指令能夠驗證映像的簽章。
步驟 1:設定登錄伺服器
要設定登錄伺服器,最簡單的方式就是從 Docker Hub 執行其基礎登錄映像。我們只需一到指令就能完成 (見下圖)。確定您開放連接埠 5000,因為這是登錄伺服器所監聽的連接埠。
ubuntu@ip-{BLOCKED}-20-187:~$ docker run -d -p 5000:5000 –restart always –name registry registry:2
Unable to find image ‘registry:2’ locally
2:Pulling from library/registry
Digest: sha256:8be26f81ffea54106bae012c6f349df70f4d5e7e2ec01b143c46e2c03b9e551d
Status:Downloaded newer image for registry:2
5df581b6eb4186edeebb40da766e7907427005d387facdb81365df35647d952d
要確認是否正確執行:
ubuntu@ip-{BLOCKED}-20-187:~$ docker ps
CONTAINER ID IMAGE COMMAND CREATED STATUS PORTS NAMES
5df581b6eb41 registry:2 “/entrypoint.sh /etc…” 4 seconds ago Up 3 seconds 0.0.0.0:5000->5000/tcp registry
步驟 2:設定 Notary 伺服器
除了設定一台登錄伺服器來儲存映像之外,我們還需要一台 Notary 伺服器來儲存映像的簽章。若單純從 Docker Hub 執行一個登錄伺服器的映像需要很多的設定步驟,所以我們就用最簡單的方式來做:從 The Update Framework 直接複製儲存庫 (repository)。我們只需一道簡單的「docker-compose up 」指令就能使用其 Dockerfile 來完成部署。
ubuntu@ip-{BLOCKED}-20-187:~$ git clone https://github.com/theupdateframework/notary[.]git
Cloning into ‘notary’…
remote:Enumerating objects:3, done.
remote:Counting objects:100% (3/3), done.
remote:Compressing objects:100% (3/3), done.
remote:Total 26412 (delta 0), reused 1 (delta 0), pack-reused 26409
Receiving objects:100% (26412/26412), 35.08 MiB | 5.32 MiB/s, done.
Resolving deltas:100% (16038/16038), done.
ubuntu@ip-{BLOCKED}-20-187:~$ cd notary/
ubuntu@ip-{BLOCKED}-20-187:~/notary$ docker-compose up -d
WARNING:The Docker Engine you’re using is running in swarm mode.
Compose does not use swarm mode to deploy services to multiple nodes in a swarm.All containers will be scheduled on the current node.
To deploy your application across the swarm, use `docker stack deploy`.<…..Too much output … cut out ….>
Creating notary_mysql_1 …
Creating notary_mysql_1 …done
Creating notary_signer_1 …
Creating notary_signer_1 …done
Creating notary_server_1 …
Creating notary_server_1 …done
有關未在 Swarm 模式下執行的這道訊息早在意料之中,因為 The Update Framework 所提供的 「docker-compose.yml」檔案與 swarm 不相容,這有兩點原因:
- 因為它使用的是「版本2」:不過這很容易解決,只要升級到「版本 3」即可。此外,可能還要再做一些變更。
- 因為它使用了一個「build:」指令: swarm 模式不支援 build 指令。您必須分開建構這些服務,然後再將它們加到登錄伺服器內。由於此時您尚未取得內容信賴簽章,所以您在部署這個服務時,務必確定您「未」強制 Docker 用戶端使用內容信賴功能。
如同前面提到,設定登錄伺服器最簡單的方法就是使用一個指令從 Docker Hub 執行基礎登錄映像。確定您的連接埠 5000 有開放,因為這是登錄伺服器所監聽的連接埠。
ubuntu@ip-{BLOCKED}-20-187:~$ docker run -d -p 5000:5000 –restart always –name registry registry:2
Unable to find image ‘registry:2’ locally
2:Pulling from library/registry
Digest: sha256:8be26f81ffea54106bae012c6f349df70f4d5e7e2ec01b143c46e2c03b9e551d
Status:Downloaded newer image for registry:2
5df581b6eb4186edeebb40da766e7907427005d387facdb81365df35647d952d
讓我們來確認一下 Notary 伺服器是否正確執行,此外,它也應該已經部署了一個自己所用的 MySQL 服務:
ubuntu@ip-{BLOCKED}-20-187:~/notary$ docker ps
CONTAINER ID IMAGE COMMAND CREATED STATUS PORTS NAMES
6c72520afc2e notary_server “/usr/bin/env sh -c …” 12 minutes ago Up 12 minutes 0.0.0.0:4443->4443/tcp, 0.0.0.0:32769->8080/tcp notary_server_1
862fea9019c9 notary_signer “/usr/bin/env sh -c …” 12 minutes ago Up 12 minutes notary_signer_1
8c8a05af5224 mariadb:10.4 “docker-entrypoint.s…” 12 minutes ago Up 12 minutes 3306/tcp notary_mysql_1
5df581b6eb41 registry:2 “/entrypoint.sh /etc…” 21 minutes ago Up 21 minutes 0.0.0.0:5000->5000/tcp registry
現在,我們需要推送一個映像到登錄當中。做法是使用儲存庫 (repository) 的網址來標記映像,然後呼叫 Docker 推送這個標記:
ubuntu@ip-{BLOCKED}-20-187:~/notary$ docker pull ubuntu:latest
latest:Pulling from library/ubuntu
54ee1f796a1e:Already exists
f7bfea53ad12:Already exists
46d371e02073:Already exists
b66c17bbf772:Already exists
Digest: sha256:31dfb10d52ce76c5ca0aa19d10b3e6424b830729e32a89a7c6eee2cda2be67a5
Status:Downloaded newer image for ubuntu:latest
docker.io/library/ubuntu:latest
ubuntu@ip-{BLOCKED}-20-187:~/notary$ docker tag ubuntu:latest localhost:5000/ubuntu:mine
ubuntu@ip-{BLOCKED}-20-187:~/notary$ docker push localhost:5000/ubuntu:mine
The push refers to repository [localhost:5000/ubuntu]
a4399aeb9a0e:Pushed
35a91a75d24b:Pushed
ad44aa179b33:Pushed
2ce3c188c38d:Pushed
mine: digest: sha256:6f2fb2f9fb5582f8b587837afd6ea8f37d8d1d9e41168c90f410a6ef15fa8ce5 size:1152
要讓 Docker 用戶端知道該使用這台伺服器,您必需設定一個環境變數指向它:
ubuntu@ip-{BLOCKED}-20-187:~/notary$ export DOCKER_CONTENT_TRUST_SERVER=https://localhost:4443
現在,讓我們來簽署映像,共有三個步驟:首先,我們必需將一個我們要用來簽署的金鑰加入 Docker。其次,我們必需將該金鑰設成 Notary 儲存庫在簽署映像時所用的金鑰 (signer),然後再簽署映像。
加入金鑰的過程如下:
ubuntu@ip-{BLOCKED}-20-187:~/notary$ docker trust key generate sample_signer
Generating key for sample_signer…
Enter passphrase for new sample_signer key with ID f39f731:
Repeat passphrase for new sample_signer key with ID f39f731:
Successfully generated and loaded private key.Corresponding public key available:/home/ubuntu/notary/sample_signer.pub
將金鑰設成簽署用金鑰 (signer):
ubuntu@ip-{BLOCKED}-20-187:~/notary$ docker trust signer add –key sample_signer.pub sample_signer localhost:5000/ubuntu:mine
Adding signer “sample_signer” to localhost:5000/ubuntu:mine…
Initializing signed repository for localhost:5000/ubuntu:mine…
You are about to create a new root signing key passphrase.This passphrase
will be used to protect the most sensitive key in your signing system.Please
choose a long, complex passphrase and be careful to keep the password and the key file itself secure and backed up.It is highly recommended that you use a password manager to generate the passphrase and keep it safe.There will be no way to recover this key.You can find the key in your config directory.
Enter passphrase for new root key with ID 65c87b3:
Repeat passphrase for new root key with ID 65c87b3:
Enter passphrase for new repository key with ID 10e5763:
Repeat passphrase for new repository key with ID 10e5763:
Successfully initialized “localhost:5000/ubuntu:mine”
Successfully added signer: sample_signer to localhost:5000/ubuntu:mine
現在,您可以執行「 docker inspect」指令來查看您加入的簽署用金鑰,但請注意目前還沒有任何標籤已簽署:
ubuntu@ip-{BLOCKED}-20-187:~/notary$ docker trust inspect localhost:5000/ubuntu:mine[
{
“Name”:”localhost:5000/ubuntu:mine”,
“SignedTags”:[],
“Signers”:[
{
“Name”:”sample_signer”,
“Keys”:[
{ “ID”:”f39f731f1c288b66c10d70905de6d98dfa40104741c878cb2766cddc6ed52f28″
}
]
}
],
“AdministrativeKeys”:[
{
“Name”:”Root”,
“Keys”:[
{ “ID”:”58617dd8ce70d089e7a2669bc782472e677466278d4519c2de5ec0148b681129″
}
]
},
{
“Name”:”Repository”,
“Keys”:[
{ “ID”:”10e5763ffaaa7e1e606575005f460369f9f3ef49e553914b50589f1b822f695b”
}
]
}
]
}
]
最後,簽署我們自己的標籤「 :mine」。
ubuntu@ip-{BLOCKED}-20-187:~/notary$ docker trust sign localhost:5000/ubuntu:mine
Signing and pushing trust data for local image localhost:5000/ubuntu:mine, may overwrite remote trust data
The push refers to repository [localhost:5000/ubuntu]
a4399aeb9a0e:Layer already exists
35a91a75d24b:Layer already exists
ad44aa179b33:Layer already exists
2ce3c188c38d:Layer already exists
mine: digest: sha256:6f2fb2f9fb5582f8b587837afd6ea8f37d8d1d9e41168c90f410a6ef15fa8ce5 size:1152
Signing and pushing trust metadata
Enter passphrase for sample_signer key with ID f39f731:
Successfully signed localhost:5000/ubuntu:mine
再使用一次「inspect」來查看「:mine」標籤已經被「sample_signer」簽署。
ubuntu@ip-{BLOCKED}-20-187:~/notary$ docker trust inspect localhost:5000/ubuntu:mine
[
{
“Name”:”localhost:5000/ubuntu:mine”,
“SignedTags”:[
{
“SignedTag”:”mine”, “Digest”:”6f2fb2f9fb5582f8b587837afd6ea8f37d8d1d9e41168c90f410a6ef15fa8ce5″,
“Signers”:[
“sample_signer”
]
}
],
“Signers”:[
{
“Name”:”sample_signer”,
“Keys”:[
{ “ID”:”f39f731f1c288b66c10d70905de6d98dfa40104741c878cb2766cddc6ed52f28″
}
]
}
],
“AdministrativeKeys”:[
{
“Name”:”Root”,
“Keys”:[
{ “ID”:”58617dd8ce70d089e7a2669bc782472e677466278d4519c2de5ec0148b681129″
}
]
},
{
“Name”:”Repository”,
“Keys”:[
{ “ID”:”10e5763ffaaa7e1e606575005f460369f9f3ef49e553914b50589f1b822f695b”
}
]
}
]
}
]
我們可以要求 Docker 用戶端驗證每一個來自您儲存庫的映像都要先經過簽署才能部署,這一點您可設定環境變數「DOCKER_CONTENT_TRUST=1」來達成。請記住,如果您使用「sudo」來執行 Docker,那麼您必須指定「–E」旗標來保留環境變數。
在 CI/CD 流程內將信賴驗證自動化
雖然檢查映像是否經過簽署 (而非檢查特定的簽章) 並不能徹底解決內部的資安需求。但如果能夠檢查您儲存庫內任何映像的簽章,就能夠將這道檢查步驟整合至 CI/CD 流程當中。您的團隊可撰寫程式碼來確定某映像是否由其擁有人所簽署,而且只有擁有人可存取私密金鑰。
這是一種不錯的方法,可確認任何部署到營運環境的映像都經由適當的對象所簽署。這樣一來,駭客就更難在您的 swarm 內部署一個惡意映像,不論是經由社交工程技巧或是某些技術手段。
DCT 功能有何限制?
像 DCT 這樣的功能最適合的用途之一就是持續監控映像的一致性。如果可以持續監控映像是否出現「未經核准」的變更,並且在發生時立刻通知您採取行動,那就太完美了。只可惜,這需要在 daemon、系統核心及檔案系統層次才能進行,完全不在 DCT 這種用戶端功能的能力範圍內。
趨勢科技 Deep Security™ 解決方案能保護主機並提供一致性監控,確保主機的 Docker 和 Kubernetes 組態設定檔案的一致性。趨勢科技 Cloud One™ – Container Security 也提供了一項功能,運用其本身的入境控管 (admission control) 功能,根據 趨勢科技Deep Security Smart Check 的掃描結果或其他容器組態設定 (如高權限容器或以 root 執行的容器) 來阻擋容器部署。
趨勢科技Hybrid Cloud Security(混合雲防護) 解決方案可提供強大、簡化、自動化的防護,讓企業將防護融入 DevOps 流程,並藉由多重的趨勢科技 XGen™ 威脅防禦技巧來保障運算時期的實體、虛擬、無伺服器以及雲端工作負載安全。趨勢科技 Cloud App Security™ 是一套防護服務平台,讓企業從單一介面保護整個混合雲環境,提供即時的資安防護,其中包括:Container Security、Workload Security、Container Security、 Container Security、Container Security 以及 Container Security 等多項服務。
對於正在尋找執行時期工作負載、容器映像以及檔案與物件儲存防護軟體的企業, Deep Security Smart Check 可讓您在開發流程當中隨時掃描工作負載與容器映像是否含有惡意程式及漏洞,在部署之前預先防範威脅。
原文出處:Docker Content Trust:What It Is and How It Secures Container Images 作者:Brandon Niemczyk (資安研究員)